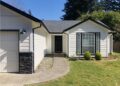
Exterior wood siding installation is a crucial aspect of enhancing the aesthetic appeal and durability of your home. This guide delves into the intricacies of wood siding installation, shedding light on its benefits, installation techniques, and maintenance tips. Get ready to embark on a journey that will transform your home’s exterior with the timeless beauty of wood siding.
In the following sections, we will explore everything you need to know about exterior wood siding installation, from pre-installation preparation to finishing touches.
Introduction to Exterior Wood Siding Installation
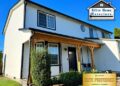
Exterior wood siding is a crucial element in enhancing the aesthetics and protection of a home. It serves as a protective barrier against the elements while adding character and charm to the exterior of the house.
There are several benefits to choosing wood siding for a home. Wood siding is durable, renewable, and provides excellent insulation properties, helping to regulate the temperature inside the house. Additionally, wood siding is versatile and can be customized to suit various architectural styles and preferences.
Types of Wood Siding
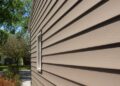
- Clapboard Siding: Also known as lap siding, this type of siding consists of long, overlapping boards that create a traditional and timeless look.
- Shingle Siding: Made of small, individual pieces of wood, shingle siding offers a rustic and textured appearance, perfect for a cottage-style home.
- Board and Batten Siding: This type of siding features wide boards with narrow strips (battens) covering the joints, creating a rustic and charming look.
- Tongue and Groove Siding: Tongue and groove siding interlocks along the edges, providing a seamless and smooth finish, ideal for modern and contemporary homes.
Pre-Installation Preparation
When it comes to installing exterior wood siding, proper preparation is key to a successful project. This includes gathering the necessary tools and materials, measuring the area accurately, and preparing the exterior wall for the siding installation.
Necessary Tools and Materials
Before starting the installation process, make sure you have the following tools and materials on hand:
- Hammer
- Nails
- Tape Measure
- Level
- Saw
- Wood Siding Panels
- House Wrap
- Flashing
- Caulk
- Primer and Paint
Measuring the Area Accurately
To ensure you order the correct amount of materials, it’s important to measure the area accurately where the wood siding will be installed. Follow these steps to measure the area correctly:
- Measure the height and width of each wall where siding will be installed.
- Multiply the height by the width to get the square footage of each wall.
- Add up the square footage of all walls to determine the total square footage needed for siding.
- Consider ordering a little extra material to account for waste or mistakes during installation.
Preparing the Exterior Wall
Properly preparing the exterior wall before installing wood siding is crucial for the longevity and durability of the siding. Here are the steps involved in preparing the exterior wall:
- Clean the surface of the wall to remove dirt, debris, and any existing paint or finish.
- Repair any damaged areas or holes in the wall to create a smooth surface for the siding.
- Apply house wrap to provide a moisture barrier and improve insulation.
- Install flashing around windows, doors, and corners to prevent water infiltration.
- Prime the wall to help the siding adhere properly and protect against moisture.
Installation Techniques

When it comes to installing wood siding on the exterior of a building, there are different techniques depending on the type of siding being used. Here, we will delve into the details of installing horizontal, vertical, and shingle-style wood siding.
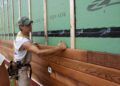
Horizontal Wood Siding Installation
Installing horizontal wood siding involves the following steps:
- Start by determining the starting point and ensuring the first piece is level.
- Continue installing subsequent pieces, ensuring they overlap correctly for proper water drainage.
- Use nails to secure each piece to the wall, making sure to leave room for expansion and contraction.
- Trim pieces as needed to fit around windows, doors, and corners.
- Finish by applying a protective finish to the wood siding to ensure durability.
Vertical Wood Siding Installation
The steps for installing vertical wood siding are as follows:
- Begin by marking the vertical layout lines on the wall to ensure proper alignment.
- Install the starter strip at the bottom of the wall, making sure it is level.
- Continue installing the siding vertically, ensuring each piece overlaps the one below it.
- Secure each piece with nails, taking care to leave space for expansion and contraction.
- Trim pieces as needed to fit around obstacles and corners.
Shingle-Style Wood Siding Installation
Installing shingle-style wood siding involves the following techniques:
- Start by installing a starter strip at the bottom of the wall to provide a base for the shingles.
- Overlap each shingle as you work your way up the wall, securing them with nails.
- Ensure proper spacing between each shingle to allow for expansion and contraction.
- Trim shingles as needed to fit around windows, doors, and corners.
- Finish by applying a protective finish to the shingles for longevity.
Finishing and Maintenance

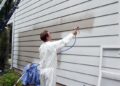
After the installation of wood siding, it is crucial to finish the wood to protect it from the elements and enhance its durability. Proper finishing can also improve the aesthetic appeal of the siding.
Finishing Options for Wood Siding
- Paint: One of the most common finishing options for wood siding is paint. It provides a wide range of colors and can offer excellent protection against moisture and UV rays.
- Stain: Staining wood siding allows the natural grain and texture of the wood to show through while providing protection against water damage and fading.
- Clear sealant: Clear sealants are a good option for homeowners who want to maintain the natural look of the wood while still providing a protective barrier against moisture.
Maintenance Tips for Wood Siding
Proper maintenance is essential to ensure the longevity of wood siding. Here are some tips to help you maintain your wood siding:
- Regularly clean the siding with a mild detergent and water to remove dirt and grime.
- Inspect the siding for any signs of damage, such as cracks or rot, and address them promptly to prevent further deterioration.
- Reapply finish as needed to maintain protection against the elements. The frequency will depend on the type of finish used and the climate in your area.
- Trim back any vegetation that comes into contact with the siding to prevent moisture buildup and potential damage.
- Ensure proper ventilation behind the siding to prevent moisture buildup and promote airflow.
Last Recap

As we conclude this comprehensive guide on exterior wood siding installation, remember that the key to a successful project lies in attention to detail and proper maintenance. By choosing wood siding, you’re not just enhancing the look of your home but also ensuring its longevity and value.
Take the first step towards a stunning exterior transformation today.
FAQ Insights
What are the benefits of choosing wood siding for a home?
Wood siding offers natural beauty, durability, and insulation properties that can enhance the overall appeal and value of your home.
How do you measure the area accurately for siding installation?
To measure accurately, calculate the square footage of the walls to be covered, subtracting areas for windows and doors.
What are the different finishing options available for wood siding?
Finishing options include paint, stain, or clear sealant, each offering unique benefits in terms of aesthetics and protection.


